Weekly Update, Tuesday, February 23, 2021
HAPPENING THIS WEEK IN MY CRAFT ROOM
Monday Live Facebook Stamping - VIP Group
- Time changed to 7 pm
- Berry Blessings and Sweet Strawberry Easel Card
Tuesday
- Weekly Update Email arrives at 8 am
- Another Sweet Strawberry Card and recipe
Thursday Live Facebook Stamping - VIP Group
- Time changed to 7 pm
- A third fun fold card in the "Just Use That DSP" series
Friday Late Night Stamping - VIP Group
- 8:00 pm
- Hang out and help me create something
Saturday
- Happy Mail Stamp Camp Last Day To Register
Sunday - my day off!
- An afternoon of stamping fun with my Team
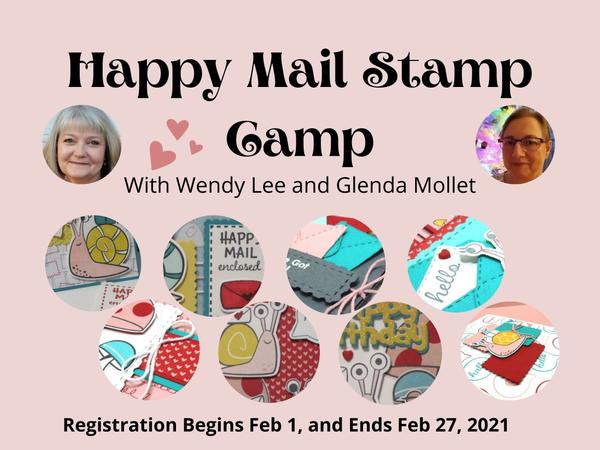
HAPPY MAIL STAMP CAMP
This is the last week to sign up for the Happy Mail Stamp Camp. Registration ends on Saturday, Feb 27th.
Sign up for the Kits plus extras for $50
Add the Snailed It Bundle for an extra $60 (no shipping or tax)
Or, get the Tutorials Only Option for $25
Kits will be shipped out early *March.
*Some items may go on back order, which could cause delays in shipping.
If purchasing the Video Tutorial Only option, please note that the tutorial links will be emailed out 3/1/2021.
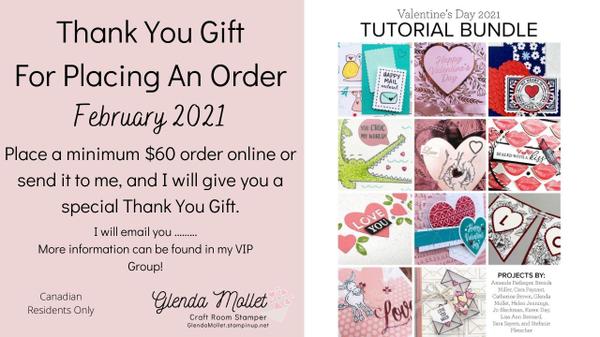
FREE TUTORIAL FILE
Anyone who places an order of $60 or more with me during February, will receive a pdf file with card projects from Demonstrators around the world.
The file will be emailed out the first week of March as my Thank You!
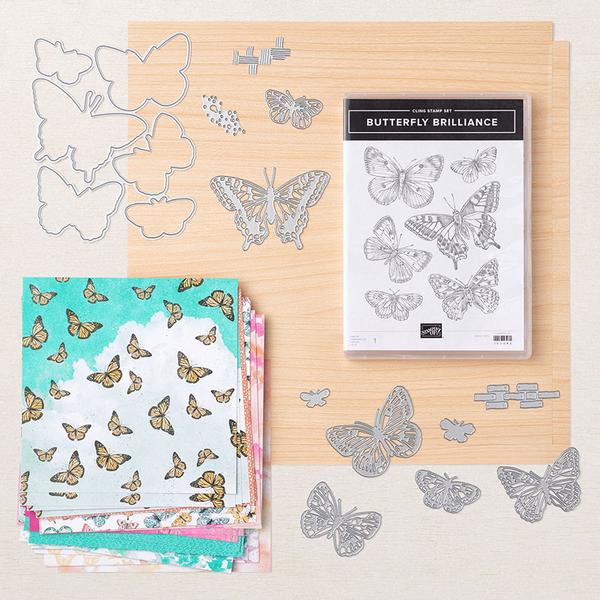
BUTTERFLY BRILLIANCE EARLY RELEASE
Available beginning March 2nd until May 3rd (some products are while supplies last only)
Prepare yourself for a burst of butterflies with the Butterfly Brilliance Background Stamp. Use this stamp to create projects for Mother's Day, weddings, and more. Pair this stamp with greetings of your choice to customize it for the season or occasion. Stamp the line-art image and add color with your choice of coloring technique, or apply different colors of ink to the stamp before stamping to create a unique look. Whatever you do with it, the results will be
glorious.
Create beautifully detailed butterflies for all of your paper crafting projects with the Brilliant Wings Dies. Once you've cut out a swarm of butterflies, you can create a background, make a focal point, or use them as accents.
Exclusive Designer Series Paper; available only during the Butterfly Bouquet promotion and while supplies last.
Some people call a group of butterflies a kaleidoscope, and that's what you'll get with the Butterfly Bijou 6" x 6" (15.2 x 15.2 cm) Designer Series Paper. Choose from glorious butterfly patterns in shades of aqua, pink, and yellow or watercoloured patterns that coordinate beautifully. You can't go wrong with these unforgettable patterns.
Exclusive Specialty Paper; available only during the Butterfly Bouquet promotion and while supplies last. Add lovely texture to your creations with the Natural Touch Specialty Paper. The pale woodgrain is versatile enough for any project and any time of year. You can stamp on it, emboss it, and use it with dies. Use large pieces of it as a background or cut out pieces to use as accents.
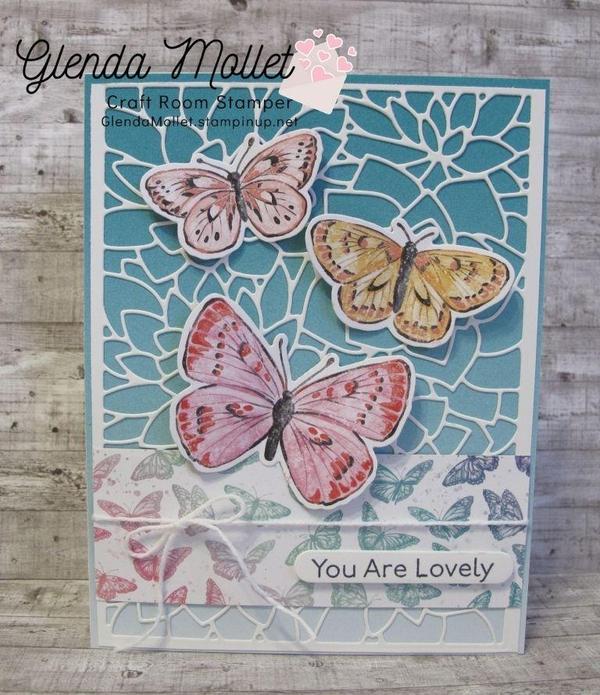
Here's a card I did recently for a blog hop. You to check the blog hop out just CLICK HERE.
CURRENT HOST CODE
The new Host Code for now to March 3rd is .... NTAH3SC4
I appreciate it when you use the host code as it allows me to continue to do the Draw Board. That is where I get all the goodies for the prizes!
Once you hit the $200 level, your order qualifies for Stampin' Rewards and you earn FREE stuff!
CLICK HERE to go to my online store and place your order, or email me and I am happy to place the order for you.
The current Draw Board only has 10 spots left then I will be giving away the Playing With Patterns Suite from pages 100 to 101 (Annual Catalogue) which includes the Playful Alphabet dies!
Good Luck!
CLASSES DURING COVID
The next Free Online Class will be held on Saturday, March 6th. The theme will be Nautical and I will use High Tide and Sailing Home. More information to follow once I have the cards made.
You don't have to have the stamps, dies, punches, etc that I use as all cards are adaptable to what you have at home. This is a fun and social time together. I would love it if you would join us!
I have not forgotten the Snowflake and Poinsettia classes that had to be postponed. These will be scheduled as soon as Dr. Bonnie gives us the go ahead to get together and travel again.
All the supplies have been ordered, and all the kits are cut. Which means my "Class Policy" is in effect. You can find the policy in every one of my Monthly Newsletters. See that policy below....
Class Policy: When you sign up for a class you have until the RSVP date to cancel and get a full refund. If you have
to cancel after the RSVP date or you are a no show, you still must pay for the class, and the class kit is yours. You are welcome to come to the Friday Drop In at the end of the month and make the projects. Please pay for your class at the time you book it. I accept Cash, Cheque or email transfer for payment of classes.
Stay tuned, and thank you so much for your patience.
MARCH NEWSLETTER
Find information on 5 classes in March along with the latest Draw Board Winner!
The new Draw Board has started, and information about that is also in my March Newsletter.
MARCH VIRTUAL 2021 CLASSES
Slider Gate Fold Class
Wednesday, March 10th
RSVP Sun. Feb 28th
Free Online Class - Nautical Themed - Sailing Home and High Tide
Saturday, March 6th
Happy Mail Stamp Camp
Sunday, March 14th
RSVP Sat. Feb 27th
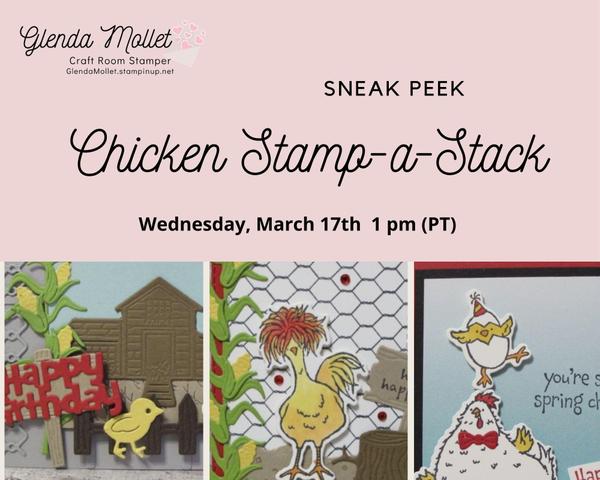
Chicken Stamp-a-Stack Class
Wednesday, March 17th
RSVP Sun. March 7th
CARD TUTORIAL
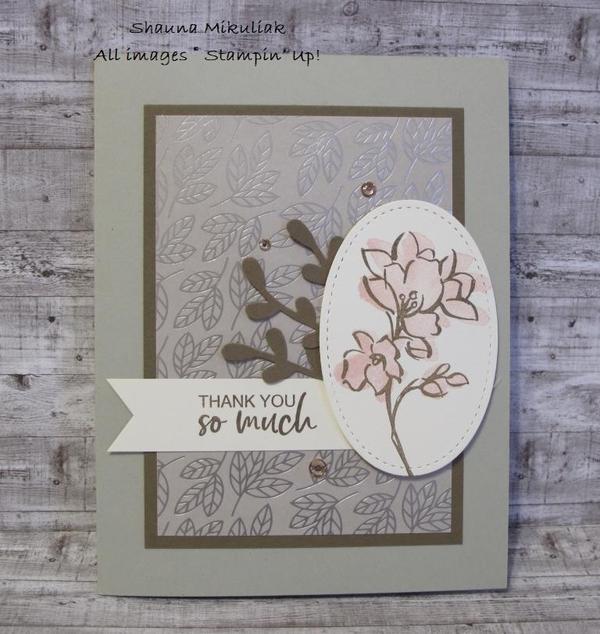
I received today's card in a swap I participated in with my Silver Sisters. This one is by Shauna Mikulak from Saskatchewan.
Recipe:
Sahara Sand 8-1/2 x 5-1/2
Very Vanilla 5-1/4 x 4 (inside) and 2 x 3-1/4 and 3/4 x 3
Soft Suede 3-1/4 x 4-1/2
Love You Always Specialty designer paper 3 x 4-1/4
Supplies:
Stamp sets: A Touch of Ink
Ink: Soft Suede, Blushing Bride
Stampin' Blends: Dark Real Red
Sprig Punch, Stitched Shapes dies, Champagne Rhinestones
Tutorial:
- Punch a sprig out of the Soft Suede piece
- Layer the designer paper onto the Soft Suede piece using Stampin' Seal
- Layer these two onto the Sahara Sand card base using Stampin' Seal
- Stamp the floral image in Soft Suede onto the 2 x 3-1/4 Very Vanilla piece
- Stamp the colour onto the stamped image using Blushing Bride ink
- Die cut this piece with the 2nd to largest Stitched Oval die
- Stamp the sentiment onto the 3/4 x 3 Very Vanilla piece using Soft Suede ink and flag the end
- Adhere the sprig to the card front using Mini Glue Dots
- Adhere the sentiment to the card front using Stampin' Seal
- Adhere the die cut oval to the card front using Stampin' Dimensionals
- Add Champagne Rhinestones
- Stamp the 5-1/4 x 4 Very Vanilla piece to match for the inside
- Stamp a Very Vanilla envelope to match
Hope to see you soon, In My Craft Room!
Stampin' Smiles
Glenda
|
|
|