Supplies:
Sweet Ice Cream Bundle (156244)
Blackberry Bliss Striped Ribbon (154569)
Ice Cream Corner DSP (154567)
Resin Hearts (154578)
Label Me Fancy Punch (151297)
Story Label Punch (150076)
1-1/2" Circle Punch (138299)
Stitched Shapes Dies (152323)
Mini Stampin' Cut & Emboss Machine (150673)
Itty Bitty Birthdays (148618)
Old Olive Cardstock (100702)
Old Olive Classic Stampin' Pad (147090)
Basic White Cardstock (159276)
Terracotta Tile Cardstock (150884)
Terracotta Tile Classic Stampin' Pad (150086)
Bumblebee Cardstock (153077)
Blackberry Bliss Classic Stampin' Pad (147092)
Bermuda Bay Classic Stampin' Pad (147096)
Versamark (102283)
White Stampin' Emboss Powder (109132)
Heat Tool (129053)
Bone Folder (102300)
Tear & Tape (138995)
Multipurpose Liquid Glue (110755)
Stampin' Dimensionals (104430)
Tutorial:
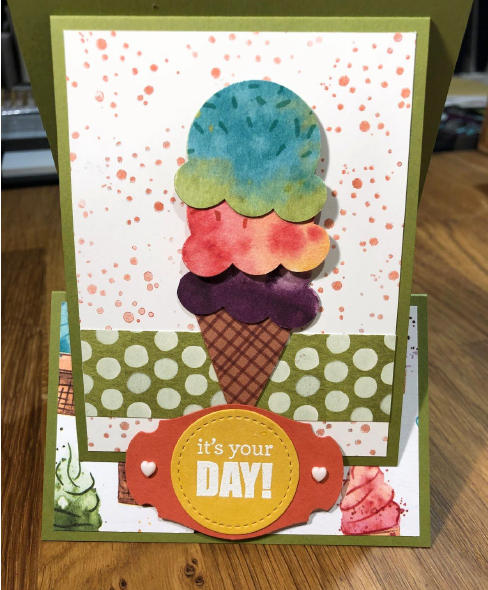
1. This is a gift-card-holding fancy fold card that's just perfect for an ice cream fan. I love the Ice Cream Corner Suite and the coordinating colours. I think this suite is suitable for any ice cream fan - male/female, kids/grown-ups (in my humble opinion).
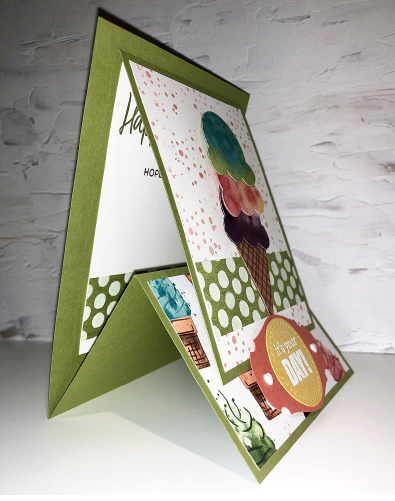
2. The card base consists of two pieces of Old Olive CS. The first is 4-1/4" x 11", scored at 2-3/4" and 5-1/2" along the long side. Fold so that it resembles half of a "w" (refer to side view photo). The second part is 3-1/2" x 9", scored at 4-1/2" and folded. Adhere this smaller section to the inside top panel of the larger Old Olive card base so that the top and sides are equally spaced (there will be a little more space at the bottom).
3.Use the Ice Cream Cone Builder Punch to punch out a cone and some ice cream scoops from the Ice Cream Corner DSP. Add sprinkles (from the Sweet Ice Cream stamp set) using coordinating inks (Bermuda Bay, Terracotta Tile and Blackberry Bliss), if desired. Set aside.
4. Cut TWO 1" x 3-1/4" strips of Ice Cream Corner DSP (Old Olive polka dot pattern). Set aside.
5. Cut TWO 3-1/4" x 4-1/4" mats of Basic White (BW) cardstock.
6. On the first BW mat, stamp the background "splatters" from the Sweet Ice Cream stamp set using Terracotta Tile (some are stamped off and some are full strength). Add one of the Old Olive polka dot pattern strips tot the bottom and then assemble and attach the triple-scoop ice cream cone, using glue and dimensionals. Attach this finished mat to the front of the smaller section of your Old Olive card base.
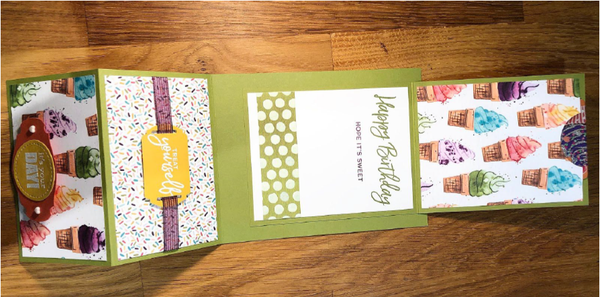
7. Open up this smaller section of your card base. This is the inside of the card, where the second BW mat will go. Stamp your sentiment (I love the sentiments from Sweet Ice Cream stamp set) using Old Olive and Blackberry Bliss Classic Stampin' Pads. Add the second strip of the Old Olive polka dot patterned DSP to the bottom of the BW mat. Attach the BW mat to the inside (refer to inside card layout).
8.Now it's time to create the gift card holder part of this fun fold card. Cut a 3-1/4" x 4-1/4" piece of Ice Cream Corner DSP (I used the soft-serve ice cream cone pattern). Use the 1-1/2" Circle Punch to punch a half circle at the top of this piece. *Carefully apply Tear & Tape to the two sides and bottom (*stay close to the edge of the paper so that there's room for the gift card). To prevent the gift card from slipping too far down the pocket, place a line of
Tear & Tape below the bottom of the gift card (use the gift card to determine placement). The inside flap of your fun fold card is done - just two more panels to go!
9. Cut a 2-1/2" x 4" piece of the sprinkle patterned Ice Cream Corner DSP. Set aside for a moment. Heat emboss the "Treat Yourself" sentiment onto a scrap of Bumblebee CS, using white embossing powder. Punch out using the Label Me Fancy Punch.
TIP: use a pencil to mark where to punch out the slots for your ribbon, before punching them out.
Add 6" of the Blackberry Bliss Striped Ribbon to the label. Use dimensionals to secure the ribbon and attach to the sprinkle panel of DSP. Use a small piece of Tear & Tape to attach the ends of the ribbon to the backside of the DSP panel. Attach the panel to the card base (see photo of the inside layout).
10. For the last panel, cut a 2-1/2" x 4" piece of the soft-serve ice cream patterned DSP. Set aside for a moment. Heat emboss the "It's your Day!" sentiment (from Itty Bitty Birthdays) onto a scrap of Bumblebee CS, using white embossing powder. Cut out using the smallest circle from the Stitched Shapes dies, using the Mini Stampin' Cut & Emboss Machine. Punch out a label using the Story Label Punch, in Terracotta Tile. Glue the Bumblebee stitched circle to the
Terracotta Tile label. Embellish with two white Resin Hearts.
11. The last step is to attach the label to the bottom front-facing panel. This is what enables the card to stay upright when on display.
IMPORTANT: close the card and line up your label so that the bottom flap can tuck into the label. **Note where to place the dimensionals (only along the bottom of the label).
12. Your card is done and now it's time to eat some ice cream (optional!). The card may not lay flat but it will fit in an
envelope and be ready for display once the recipient removes it from the envelope.